
sonicjam的官方網站,兩個有趣的角色在唱歌,對話十分搞笑,網站由3D呈現,效果不錯
Flex 4 Gumbo
官方網站目前己可下載Milestone的SDK,雖然沒有IDE可用,但還是可體驗一下Flex4 Gumbo的新語法,比較特殊的是FXG跟State吧,其它的還在看
SDK下載頁面:http://opensource.adobe.com/wiki/display/flexsdk/Download+Flex+4
官方介紹頁:http://opensource.adobe.com/wiki/display/flexsdk/Gumbo
[PureMVC] 使用Pipes Util 實現Module間溝通
之前在Micro Architecture PureMVC一篇有介紹到多核版的PureMVC架構,所謂的多核,指的是同一專案能出現多個實做PureMVC的模塊,在Flex是以Module的方式實現,讓每個Module都有各自的Facade,功能獨立。但PureMVC本身未提供Module間彼此溝通的方法,雖然我們可以用Interface等方法來管理每個Module,但這會使程式的關聯太高,失去MVC的好處,所幸己有高手解決了這個問題,官方網站的Pipes Util就是用來處理Module的問題,他能在Module間再架一層溝通架構,能每個Module都能像送Notification的方式彼此溝通,下面寫個簡單的範例說明
程式為Shell跟Module互傳訊息,Shell是讀入Module的主程式,Module是獨立的PureMVC架構

PipeUtil主要是靠JunctionMediator跟其它Module溝通,由於JunctionMediator是繼承自Mediator,所以可再收發Notification,使Module間的訊息可走回原本的PureMVC架構
package idv.gd.hellopipes.shell.view
{
        import idv.gd.hellopipes.common.PipeAwareModule;
        import idv.gd.hellopipes.shell.ApplicationFacade;

        import org.puremvc.as3.multicore.interfaces.INotification;
        import org.puremvc.as3.multicore.utilities.pipes.interfaces.IPipeAware;
        import org.puremvc.as3.multicore.utilities.pipes.interfaces.IPipeMessage;
        import org.puremvc.as3.multicore.utilities.pipes.messages.Message;
        import org.puremvc.as3.multicore.utilities.pipes.plumbing.Junction;
        import org.puremvc.as3.multicore.utilities.pipes.plumbing.JunctionMediator;
        import org.puremvc.as3.multicore.utilities.pipes.plumbing.Pipe;
        import org.puremvc.as3.multicore.utilities.pipes.plumbing.TeeMerge;
        import org.puremvc.as3.multicore.utilities.pipes.plumbing.TeeSplit;

        /**
         * junction是實際拿來連結的實體,架構在原本的puremvc內(mediator)
         */
        public class ShellJunctionMediator extends JunctionMediator
        {
                public static const NAME:String = "AppJunctionMediator";

                public function ShellJunctionMediator()
                {
                        //Junction為不可見的連結實體,用來管理 shell跟module的關係
                        super(NAME, new Junction());
                }

                override public function listNotificationInterests():Array
                {
                        return [ApplicationFacade.MODULE_ADDED, ApplicationFacade.SEND_MESSAGE];
                }

                override public function handleNotification(note:INotification):void
                {
                        switch (note.getName())
                        {
                                case ApplicationFacade.MODULE_ADDED:
                                {
                                        var module:IPipeAware = IPipeAware(note.getBody());
                                        connectPipe(module);
                                        break;
                                }
                                case ApplicationFacade.SEND_MESSAGE:
                                {
                                        var message:Message = new Message(PipeAwareModule.SHELL_MESSAGE, null, note.getBody());
                                        junction.sendMessage(PipeAwareModule.SHELL_TO_MODULE, message);

                                        break;
                                }
                        }
                }

                /**
                 * 連結pipe跟接口
                 */
                private function connectPipe(module:IPipeAware):void
                {
                        //註冊pipe及產生接口
                        junction.registerPipe(PipeAwareModule.SHELL_TO_MODULE, Junction.OUTPUT, new TeeSplit());
                        junction.registerPipe(PipeAwareModule.MODULE_TO_SHELL, Junction.INPUT, new TeeMerge());

                        //監聽訊息
                        junction.addPipeListener(PipeAwareModule.MODULE_TO_SHELL, this, handlePipeMessage);

                        //連結 module跟shell
                        var moduleToShell:Pipe = new Pipe();
                        module.acceptOutputPipe(PipeAwareModule.MODULE_TO_SHELL, moduleToShell);

                        var shellInFitting:TeeMerge = junction.retrievePipe(PipeAwareModule.MODULE_TO_SHELL) as TeeMerge;
                        shellInFitting.connectInput(moduleToShell);

                        //連結shell跟module
                        var shellToModule:Pipe = new Pipe();
                        module.acceptInputPipe(PipeAwareModule.SHELL_TO_MODULE, shellToModule);

                        var shellOutFitting:TeeSplit = junction.retrievePipe(PipeAwareModule.SHELL_TO_MODULE) as TeeSplit;
                        shellOutFitting.connect(shellToModule);
                        trace("connected");
                }

                override public function handlePipeMessage(message:IPipeMessage):void
                {
                        switch (message.getType())
                        {
                                case PipeAwareModule.MODULE_MESSAGE:
                                {
                                        sendNotification(ApplicationFacade.GET_MESSAGE, message.getBody());
                                        break;
                                }
                        }
                }

        }
}
連結是透過Pipe監聽訊息,這部分寫起來比較麻煩,但可限制那些Module之間可以溝通,以及要監聽的訊息
Micro Architecture ─ PureMVC Part2
把之前的補完,先介紹一下Mediator
Mediator用來管理可見元件,讓原本UI能與PureMVC溝通,主要負責觸發跟反應Notification
ApplicationMediator
package idv.gd.pureMVCTest.view
{
        import flash.events.MouseEvent;

        import idv.gd.pureMVCTest.ApplicationFacade;

        import org.puremvc.as3.interfaces.INotification;
        import org.puremvc.as3.patterns.mediator.Mediator;

        public class ApplicationMediator extends Mediator
        {
                public static const NAME:String = "ApplicationMediator";

                public function ApplicationMediator(viewComponent:Main)
                {
                        super(NAME, viewComponent);
                }

                /**
                 * view內所有的元件註冊在此
                 */
                override public function onRegister():void
                {
                        super.onRegister();

                        facade.registerMediator(new RSSReaderMediator(main.reader));

                        main.newsBtn.addEventListener(MouseEvent.CLICK, getNewsHandler);
                        main.techBtn.addEventListener(MouseEvent.CLICK, getTechHandler);
                }

                private function getNewsHandler(event:MouseEvent):void
                {
                        facade.sendNotification(ApplicationFacade.READ_NEWS);
                }

                private function getTechHandler(event:MouseEvent):void
                {
                        facade.sendNotification(ApplicationFacade.READ_TECH);
                }

                protected function get main():Main
                {
                        return viewComponent as Main;
                }
     }
}
Mediator會對應到一個名稱,寫法上以常數宣告,讓Facade可取用對象,若Mediator所管理的UI有子元件,每個子元件都可在此註冊,在寫法上為了避免管理的子元件尚未生成,註冊元件時應盡量寫在onRegister裡,Constructor有時會出現問題
雖然Mediator可取得Proxy跟其它的Mediator,但會耦合性會過高,以Notification通知Command,再以Command操作Proxy的方式比較妥當,而Mediator去操作其它的Mediator是絕對不允許的
Proxy同Mediator要有一個識別名,用來管理資料及封裝操作的方法,實現Domain Logic,在官方文件還有一種RemoteProxy,不過我個人比較喜歡拆成Delegate跟Proxy,讓Delegate管遠端要值的方法,方便之後抽換
RSSProxy
package idv.gd.pureMVCTest.model
{
        import idv.gd.pureMVCTest.ApplicationFacade;
        import idv.gd.pureMVCTest.model.business.RSSDelegate;
        import idv.gd.pureMVCTest.model.vo.InfoVO;

        import mx.collections.ArrayCollection;
        import mx.controls.Alert;
        import mx.rpc.IResponder;

        import org.puremvc.as3.patterns.proxy.Proxy;

        /**
         * proxy用來維護資料,保有原始資料及操作方法
         */
        public class RSSProxy extends Proxy implements IResponder
        {
                public static const NAME:String = "DataProxy";

                public function RSSProxy(data:Object = null)
                {
                        super(NAME, data);
                }

                /**
                 * 使用 delegate來取得內容,使用 delegate才方便抽換取得來源
                 */
                public function getRealNews():void
                {
                        var delegate:RSSDelegate = new RSSDelegate(this);

                        delegate.getNews();
                }

                public function getTech3c():void
                {
                        var delegate:RSSDelegate = new RSSDelegate(this);

                        delegate.getTech3c();
                }

                public function removeItemAt(index:uint):void
                {
                        if (infoVO)
                        {
                                infoVO.content.removeItemAt(index);
                        }
                }

                public function removeAll():void
                {
                        infoVO.content.removeAll();
                }

                public function result(resultEvent:Object):void
                {
                        var data:Object = resultEvent.result;
                        var title:String = data.rss.channel.title;
                        var lastBuildDate:String = data.rss.channel.lastBuildDate;
                        var content:ArrayCollection = data.rss.channel.item;

                        var vo:InfoVO = new InfoVO(title, lastBuildDate, content);

                        this.data = vo;

                        this.facade.sendNotification(ApplicationFacade.RSS_LOAD_COMPLETE, infoVO);
                }

                public function fault(data:Object):void
                {
                        this.facade.sendNotification(ApplicationFacade.RSS_LOAD_FAULT);
                }

                protected function get infoVO():InfoVO
                {
                        return data as InfoVO;
                }

      }
}
在多核心的版本,其實只是多了一組管理Facade的Map,跟Mediator及Proxy一樣,生成時要有個識別的名字,其它用法一樣
Main.mxml
//進入點要有識別名,用來識別 facade instance
public const NAME:String = "Main";
private var facade:ApplicationFacade = ApplicationFacade.getInstance(NAME);
ApplicationFacade
public function ApplicationFacade (key:String)
{
        super(key);
}
原始檔下載(Flex專案檔,附PureMVC Standard)
iPhone os 3.0 即將登場,仍不支援Flash

今天看到iPhone OS 3.0的新聞,雖然增加了許多功能,但最關心的Flash還是不支援 (="=),Adobe從去年10月就說Flash Player要登上iPhone,但至今仍無消息,我相信Adobe一定能解決Flash在iPhone上執行的問題,畢竟iPhone都可以放youTube了,剩下只看Apple肯不肯點頭
新聞頁面 http://www.techcrunch.com/2009/03/17/live-from-apples-iphone-30-press-conference/
Micro Architecture ─ PureMVC Part1
PureMVC架構比較複雜,整理幾篇學習的心得跟大家分享
PureMVC跟Cairngorm一樣是幫助程式設計師在設計程式時,能有效分出Model、View、Controller的架構,比較特殊的是,PureMVC提供了多port版本,也就是除了Flex/Flash外,PureMVC也可用在C#、C、Java等其它語言上,使用非常地廣範(學起來不吃虧 :-)),而在AS3語法,PureMVC分成兩個版本 ─ Standard跟MultiCore,Standard是指一般的PureMVC架構,把程式分成了Facade、Proxy、Command跟Mediator,而MultiCore則是允許一個專案有多核心的PureMVC架構,每個架構都有自己的Facade,彼此不會衝突,MultiCore在其它語言較少用到,在Flex可做為Module的應用,之後會再寫一篇介紹。
PureMVC由幾個主要元件構成,元件包括:
- Facade:Singleton,每個專案只有一個,用來管理Model、View及Controller之間的溝通,可處理註冊(Register)、取得(Retrieve)及刪除(Remove) 元件
- Notification:取代原架構的Event,用來在元件間傳遞訊息(Nitification可帶一個Body物件跟一個Type字串)
- Mediator:用來管理View Component的操作,可接收及發送Notification
- Proxy:用來管理及操作資料,只發不收Notification(資料更新時,發送更新訊息),若要存取遠端資料,可再利用Delegate的方式,把遠端操作封裝起來,提升程式再用性
- Command:用來管理應用程式的Business Logic,協調Model跟View,本身是無狀態,只有在需要時才被創建,執行完後即刪除
官方網站 http://puremvc.org/
Example - Flex AS3 Standard PureMVC
程式架構

範例為簡單的RSS Reader ,可讀取XML及刪除清單資料
程試的入口是main,我們先生成Facade,並在main載入完成後設定Facade的初值:applicationComplete="facade.startup(this);" (把Main的參照傳進去)
<?xml version="1.0" encoding="utf-8"?>
<mx:Application xmlns:mx="http://www.adobe.com/2006/mxml"
        layout="absolute"
        applicationComplete="facade.startup(this);"
        fontSize="12"
        pageTitle="PureMVC Test Page"
        xmlns:view="idv.gd.pureMVCTest.view.components.*">

        <mx:Script>
                <![CDATA[
                        import idv.gd.pureMVCTest.view.ApplicationMediator;
                        import idv.gd.pureMVCTest.ApplicationFacade;

                        private var facade:ApplicationFacade = ApplicationFacade.getInstance();
                ]]>
        </mx:Script>
        <view:RSSReader id="reader" />
        <mx:Button id="newsBtn" label="Read News" x="112" y="408"/>
        <mx:Button id="techBtn" label="Read Tech" x="10" y="408"/>
</mx:Application>
Facade可視為PureMVC的總管,Proxy、Mediator及Command都可以透過Facade向其它元件存取
package idv.gd.pureMVCTest
{
        import idv.gd.pureMVCTest.controller.ApplicationStartupCommand;
        import idv.gd.pureMVCTest.controller.DeleteDataCommand;
        import idv.gd.pureMVCTest.controller.ReadRSSCommand;

        import org.puremvc.as3.patterns.facade.Facade;

        public class ApplicationFacade extends Facade
        {
                public static const STARTUP:String = "startup";

                public static const RSS_LOAD_COMPLETE:String = "rssLoadComplete";
                public static const RSS_LOAD_FAULT:String = "rssLoadFault";

                public static const DELETE_ITEM:String = "deleteItem";
                public static const DELETE_ALL:String = "deleteAll";

                public static const READ_NEWS:String = "readNews";
                public static const READ_TECH:String = "readTech";

                /**
                 * 在controller生成後,加入起始事件
                 */
                override protected function initializeController():void
                {
                        super.initializeController();

                        this.registerCommand(STARTUP, ApplicationStartupCommand);
                        this.registerCommand(DELETE_ITEM, DeleteDataCommand);
                        this.registerCommand(DELETE_ALL, DeleteDataCommand);

                        this.registerCommand(READ_NEWS, ReadRSSCommand);
                        this.registerCommand(READ_TECH, ReadRSSCommand);

                }

                public static function getInstance():ApplicationFacade
                {
                        if (instance == null)
                                instance = new ApplicationFacade();

                        return instance as ApplicationFacade;
                }

                /**
                 * 起始程式,傳入起始的 Application
                 */
                public function startup(app:Main):void
                {
                        this.sendNotification(STARTUP, app);
                }

        }
}
在Facade裡先註冊要用到的Command(集中管理,類似Cairngorm的FrontController,指示Notification要執行那個command),其中有一個以Startup命名的Command是程式的進入點,這個Command會去註冊其它要用到的Mediator及Proxy,當然不叫Startup也可以,不過官方都建議這樣寫了,還是照寫吧,提升可讀性,這個命令是在Main.mxml生成完後調用,透過Notification觸發
Command有分兩種,MacroCommand及SimpleCommand,顧名思義,Macro就是可執行多命令的Command,Simple就只執行單一命令,為了練習,範例在ApplicationStartupCommand去執行ModelPrepCommand及ViewPrepCommand兩個Command,這兩個Command有順序性,照PureMVC的說法,第一個執行完後才會執行下一個
範例註冊Proxy及Mediator,並在Mediator生成後給調用Proxy取值
package idv.gd.pureMVCTest.controller
{
        import org.puremvc.as3.interfaces.INotification;
        import org.puremvc.as3.patterns.command.MacroCommand;

        public class ApplicationStartupCommand extends MacroCommand
        {
                //MacroCommand 的進入點
                override protected function initializeMacroCommand():void
                {
                        //MacroCommand 可執行多 SimpleCommand,生成有順序性,notification向下傳遞
                        this.addSubCommand(ModelPrepCommand);
                        this.addSubCommand(ViewPrepCommand);
                }
        }
}
package idv.gd.pureMVCTest.controller
{
        import idv.gd.pureMVCTest.model.RSSProxy;

        import org.puremvc.as3.multicore.interfaces.INotification;
        import org.puremvc.as3.multicore.patterns.command.SimpleCommand;

        /**
         * 生成資料 proxy
         */
        public class ModelPrepCommand extends SimpleCommand
        {
                //SimpleCommand 的進入點
                override public function execute(notification:INotification):void
                {
                        this.facade.registerProxy(new RSSProxy());
                }
        }
}
package idv.gd.pureMVCTest.controller
{
        import idv.gd.pureMVCTest.model.RSSProxy;
        import idv.gd.pureMVCTest.view.ApplicationMediator;

        import org.puremvc.as3.multicore.interfaces.INotification;
        import org.puremvc.as3.multicore.patterns.command.SimpleCommand;

        /**
         * 生成 mediator,實際向proxy取值
         */
        public class ViewPrepCommand extends SimpleCommand
        {
                //SimpleCommand 的進入點
                override public function execute(notification:INotification):void
                {
                        var mainApp:Main = Main(notification.getBody());
                        var rssProxy:RSSProxy = this.facade.retrieveProxy(RSSProxy.NAME) as RSSProxy;

                        this.facade.registerMediator(new ApplicationMediator(mainApp));

                        rssProxy.getRealNews();
                }

        }
}
篇幅有點大了,先介紹到這,下一篇再來介紹Mediator跟Proxy
Adobe釋出Reader 9 更新檔
Adobe釋出Reader 9 及Acrobat 9更新檔,更新至9.1,主要修正安全性問題,更早版本的Reader則晚點才會發佈,有需要的可以去下載
原文:http://www.adobe.com/support/security/bulletins/apsb09-03.html
Micro Architecture ─ Cairngorm
Cairngorm是Flex上的微架構,主要是幫助設計師在撰寫程式時,能有效把專案分成Model、View、Controller三種架構,方便日後的維護與修改,這種架構比傳統寫法(只使用類別或介面做分類)來的複雜,開發時間也較長,但對長久經營的軟體來說,這種分法絕對有利,畢竟大型專案愈到後面會愈複雜,MVC的架構在維護跟分工上都比較容易。
Cairngorm是以Flex為基礎的架構,顧名思義,只能在Flex使用,因為Cairngorm用到了很多只有Flex才有的特性,像是Data Binding、States,雖然很方便但這也限制了程式的發展,如果你想用非Flex的元件,那只能再包一層Component,並使用Binding Util來符合原本的架構,這就失去了原本Flex開發的好處,不過Cairngorm是Adobe官方認可架構,在純Flex開發上還是有他的優勢存在,而且很簡單,如果是初試MVC的新手,可以先學學看Cairngorm,了解一下MVC的好處,之後可在嘗試其它的Framework(像是pureMVC、Mate、Swize)。
Cairngorm大至上可分成FrontController、ModelLocator、ServiceLocator及View跟Event這五類
- FrontController是管理Event觸發時所要執行的Command,Command可存取ModelLocator或向遠端要值
- ModelLocator為Singleton,定義了所有用到的資料,所有的View都能以Binding的方式向此要資料
- ServiceLocator同樣為Singleton,定義了遠端溝通的方法,並藉由Delegate的方式向遠端要值
- View為所有用到的可視元件,可觸發Event
- Event定義了事件的類形及傳送值
Adobe Opensource Cairngorm http://opensource.adobe.com/wiki/display/cairngorm/Cairngorm
做個簡單範例,先看一下類別圖

程式入口,先生成所有物件,除了TestModelLocator外其它都以mxml撰寫
<?xml version="1.0" encoding="utf-8"?>
<mx:Application xmlns:mx="http://www.adobe.com/2006/mxml" layout="horizontal"
        initialize="init();"
        xmlns:control="idv.gd.control.*"
        xmlns:views="idv.gd.views.*"
        xmlns:business="idv.gd.business.*"      >

        <mx:Script>
                <![CDATA[
                        import idv.gd.model.TestModelLocator;

                        private function init():void
                        {
                                //一開始生成本地資料,讀入LSO
                                TestModelLocator.getInstance();
                        }
                ]]>
        </mx:Script>
        <control:Controller id="controler" />
        <views:BasicView />
        <business:Services />
</mx:Application>
在Controller我定義了那些Event要做那些Command
package idv.gd.control
{
        import com.adobe.cairngorm.control.FrontController;
        import com.adobe.cairngorm.control.CairngormEventDispatcher;
        import idv.gd.events.SubmitEvent;
        import idv.gd.events.FormEvent;
        import idv.gd.commands.LoginCommand;
        import idv.gd.commands.FormChangeCommand;
        import idv.gd.commands.RegisterCommand;

        public class Controller extends FrontController
        {
                public function Controller()
                {
                        this.addCommand(SubmitEvent.LOGIN_SUBMIT, LoginCommand);
                        this.addCommand(SubmitEvent.REGISTER_SUBMIT, RegisterCommand);

                        this.addCommand(FormEvent.REGISTER, FormChangeCommand);
                        this.addCommand(FormEvent.LOGIN, FormChangeCommand);
                }
        }
}
在Command內,我們可以操作Model跟透過Delegate向Server要值,比較特殊的是我把RegisterCommand 實作了IResponder,讓Delegate直接送回傳值給Command
public class RegisterCommand implements ICommand, IResponder
{
        private var model:TestModelLocator = TestModelLocator.getInstance();

        public function execute(event:CairngormEvent):void
        {
                var submitEvent:SubmitEvent = SubmitEvent(event);

                var delegate:ServerDelegate = new ServerDelegate(this);

                model.formEnabled = false;
                model.msg = "讀取資料中";

                delegate.getHSData();
        }

        //用來接受從serverlocator回傳的訊息
        public function result(event:Object):void
        {
                //trace(event);
                model.formEnabled = true;
                model.msg = "註冊成功 msg:" + event.result;
        }

        public function fault(event:Object):void
        {
                //trace(event);
                model.formEnabled = true;
                model.msg = "註冊失敗 msg:" + event.message;
        }
}
使用Delegate透過Servers的serviceHS收發資料,並傳回給Command(Responder),Services記得在一開始時要先生成
package idv.gd.business
{
        import com.adobe.cairngorm.business.ServiceLocator;

        import mx.rpc.AsyncToken;
        import mx.rpc.IResponder;
        import mx.rpc.Responder;
        import mx.rpc.events.FaultEvent;
        import mx.rpc.events.ResultEvent;
        import mx.rpc.http.HTTPService;

        /**
         * ServiceDelegate為伺服器資料的代理,透過CairngormCommand存取位置網路端的資料
         * 本身要能處理伺服器端的反應(result, fault),整理結果並回傳給CairngormCommand
         */
        public class ServerDelegate
        {
                private var commandResponder:IResponder;

                /**
                 * 接收responder
                 * @param responder 用來觸發反應的responder物件,一般為CairngormCommand
                 */
                public function ServerDelegate(responder:IResponder)
                {
                        commandResponder = responder;
                }

                /**
                 * 透過Service.mxml生成與伺服器溝通的HTTPService物件
                 * 利用asyncToken接收非同步訊息
                 */
                public function getHSData():void
                {
                        var delegateService:HTTPService = ServiceLocator.getInstance().getHTTPService("serviceHS");
                        var asyncToken:AsyncToken = delegateService.send();

                        asyncToken.addResponder(commandResponder);
                }
        }
}
View以DataBinding方式挷定State跟Model
<mx:Canvas xmlns:mx="http://www.adobe.com/2006/mxml" width="374" height="220"
        creationComplete="init();"
        currentState="{model.currentState}"
        enabled="{model.formEnabled}"
        backgroundColor="#FFFFFF">
[Bindable]
private var model:TestModelLocator = TestModelLocator.getInstance();
Model實際上只存值,不做事件的發送(DataBinding己做掉了),可以視情況使用getter跟setter
package idv.gd.model
{
        import com.adobe.cairngorm.model.IModelLocator;
        import flash.net.SharedObject;

        [Bindable]
        public class TestModelLocator implements IModelLocator
        {
                public var userName:String = "";
                public var userPWD:String = "";
                public var currentState:String = "";
                public var msg:String = "請輸入使用者帳號";

                public var isRemember:Boolean = false;
                public var formEnabled:Boolean = true;

                public var LSOName:String = "userInfo";

                private static var instance:TestModelLocator = null;

                /**
                 * 第一次生成時讀入LSO
                 */
                public function TestModelLocator(model:SingleModel)
                {
                        var lso:SharedObject = SharedObject.getLocal(LSOName);

                        if (lso.data.isRemember)
                        {
                                userName = lso.data.userName;
                                userPWD = lso.data.userPWD;
                                isRemember = lso.data.isRemember;
                        }
                }

                public static function getInstance():TestModelLocator
                {
                        if (instance == null)
                                instance = new TestModelLocator(new SingleModel());

                        return instance;
                }
        }
}
//for singleton
class SingleModel
{
        public function SingleModel()
        {
        }
}
Open Flash Chart 免費的Flash圖表
如果只想做簡單的Chart圖,Open Flash Chart是很方便的工具,這是以AS3所撰寫的圖表工具,雖然說是open但軟體並未提供相關類別可操作,而是以chart.swf做為黑盒子,所有繪圖都靠這只swf,我們能做的只是匯入資料跟下參數而己,如果想做更自由的Chart,或許還是只能用Flex的solution
程式名稱:Open Flash Chart
授權版本:GNU
有趣的webcam搖捍
網站上可下載免費程式,只要有webcam就可以使用,除了範例的遊戲以外,也可模擬其它遊戲的搖捍,非常有趣
CamSpace:http://www.camspace.com/
WebCam相容列表:http://wiki.camspace.com/index.php/Tested_Webcams
Farm Frenzy 農場遊戲

Alawar公司出品的Flash Game,這種遊戲相當耐玩,遊戲簡單且變化多樣,值得學習
Farm Frenzy Pizza Party
http://www.bigfishgames.com/online-games/4890/farm-frenzy-pizza-party/index.html
Farm Frenzy 2
http://www.bigfishgames.com/online-games/4741/farm-frenzy-2/index.html
Farm Frenzy
http://www.bigfishgames.com/online-games/3838/farm-frenzy/index.html
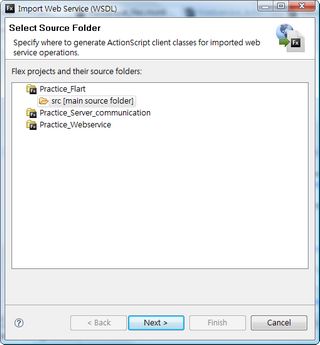
使用Flex import WebService
Flex IDE提供了一個好用的功能,可把網路上的WebService解析並產生類別,讓在使用WebService時可明確知道有那些方法,並產生明確的接收事件跟VO
首先選擇 Data -> Import WebService,在跳出的視窗選要儲存的位置
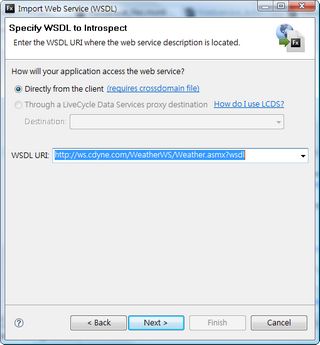
之後輸入要匯入的 WebService WSDL URL
等轉換完成後你會看到一包分好的類別
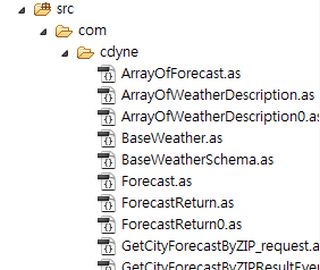
之後把整包類別做好連結,就可像程式一樣調用方法跟事件,由於有code hit使用起來還蠻方便的
<?xml version="1.0" encoding="utf-8"?>
<mx:Application xmlns:mx="http://www.adobe.com/2006/mxmlquot; layout="absolute" applicationComplete="main();">
        <mx:Script>
                <![CDATA[
                        import mx.utils.ObjectUtil;
                        import com.cdyne.WeatherReturn;
                        import com.cdyne.GetCityWeatherByZIP_request;
                        import com.cdyne.GetCityWeatherByZIPResultEvent;
                        import com.cdyne.GetWeatherInformation_request;
                        import com.cdyne.GetWeatherInformationResultEvent;
                        import com.cdyne.Weather;

                        [Bindable]
                        private var myWeater:Weather = new Weather();

                        private function main():void
                        {
                                myWeater.addgetCityWeatherByZIPEventListener(resultHandler);
                        }

                        private function resultHandler(event:GetCityWeatherByZIPResultEvent):void
                        {
                                var weaterReturn:WeatherReturn = WeatherReturn(event.result);

                                msg.text = weaterReturn.City;
                        }

                        private function useListener():void
                        {
                                myWeater.getCityWeatherByZIP(zipField.text);
                        }

                        private function useLastResult():void
                        {
                                var request:GetCityWeatherByZIP_request = new GetCityWeatherByZIP_request();

                                request.ZIP = zipField.text;

                                myWeater.getCityWeatherByZIP_request_var = request;
                                myWeater.getWeatherInformation_send();
                        }
                ]]>
        </mx:Script>
        <mx:TextArea x="10" y="10" width="487" height="204" id="msg" text="{myWeater.getWeatherInformation_lastResult}"/>
        <mx:Button x="153" y="222" label="use Listener" click="useListener()"/>
        <mx:Button x="256" y="222" label="use LastResult" click="useLastResult()"/>
        <mx:TextInput x="10" y="222" width="135" id="zipField" text="37217"/>
</mx:Application>
這個範例測試兩種收值方法,一種是用send及lastResult,另一種是用EventLitener去監聽事件,雖然都是用匯入的 WebService方法,但概念跟一般WebService用法相同
Flex SDK 3.3發佈
有人可能跟我一樣好奇,為什麼前一陣子的 Flex Langeuage Reference版本是3.3而官網卻沒有3.3可更新,終於在今天(3/4)看到 SDK 3.3 Milestone,雖然Adobe Update還沒有更新,但有興趣的人可以先下載回來安裝
SDK下載頁:http://opensource.adobe.com/wiki/display/flexsdk/Download+Flex+3
修正問題:http://bugs.adobe.com/jira/secure/IssueNavigator.jspa?mode=hide&requestId=12020
訂閱:
文章 (Atom)


