顯示具有 Flex 標籤的文章。 顯示所有文章


[教學]使用Flash的conditional compiling

0 意見

條件式編譯(conditional compiling)簡單來說是可透過參數決定程式區段是否要編譯,舉個簡單例子,在程式開發時的debug code,這些code在發佈時用不到,多了只會佔資源,這時就可用條件式編譯做個開關,在發佈時排除程式碼,且這些code也不會編至swf,所以即使反編譯也看不到,算是簡單的防護,重點是在管理專案上很方便。

寫些簡單範例

在Flash使用conditional compiling

首先在要加條件的區段上加入

function showMsg():void
{
CONFIG::TEST
{
    trace("test is true");
    return;
}
trace("test is false");
}
showMsg();
然後在Flash CS4的發佈設定->Actionscript 3設定->組態常數中加入CONFIG::TEST

2010-01-18_193901.png

這段程式碼的意思為當CONFIG::TEST為true時,執行區段下的程式碼,所以範例的結果為test is true,由於有下return所以後面的程式都不會執行

在Flex下使用conditional compiling

Main.mxml

<?xml version="1.0" encoding="utf-8"?>
<mx:Application xmlns:mx="http://www.adobe.com/2006/mxml" layout="absolute">
<mx:applicationComplete>
    <![CDATA[
        function showMsg():void
        {
            CONFIG::TEST
            {
                 trace("test is true");
                return;
              }
            trace("test is false");
        }
    
        showMsg();
    ]]>
</mx:applicationComplete>
</mx:Application>
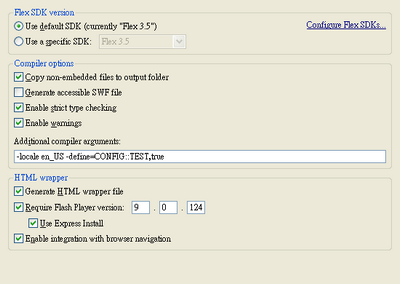
到project Properties ->Flex Compiler中加入參數 -define=CONFIG::TEST,true

2010-01-18_195616.png

輸出結果一樣為test is true

最後反編譯檔案看一下結果,先把CONFIG::TEST設為false,讓區段的程式碼不編譯,用SWF Decompiler觀看反編譯後的結果

        public function showMsg() : void
    {
        trace("test is false");
        return;
    }// end function
trace("test is true"); 確實沒有被編進去,這樣就能控管專案的程式了。

參考文章:

Flex Help:http://livedocs.adobe.com/flex/3/html/help.html?content=compilers_21.html

Inside RIA:http://www.insideria.com/2009/10/create-cleaner-actionscript-wi.html


[心得]Mate的ListenerInjector

0 意見

之前有介紹過Mate 的Event map及Model map架構,這次來講Mate的ListenerInjector 。

同之前的 Model Map的概念,PropertyInjector能為 View注入資料,顧名思義,ListenerInjector則可為View注入監聽,在設計專案的時候,可用ListenerInjector把View的互動建立起來,建立一張 Listener Map表,明確指出事件跟View的關連,方便後期維護,且透過EventAnnouncer,在Event Map也能調用View的變化,使用起來很方便

簡單的ListenerInjector 寫法如下

ListenerMap.mxml

<?xml version="1.0" encoding="utf-8"?>
<EventMap xmlns="http://mate.asfusion.com/" xmlns:mx="http://www.adobe.com/2006/mxml" >
<Injectors target="{Main}" debug="true">
   <ListenerInjector eventType="{NavigateEvent.GOTO_HOME}" method="navigateStateHandler" />
   <ListenerInjector eventType="{NavigateEvent.GOTO_MUSIC}" method="navigateStateHandler"/>
   <ListenerInjector eventType="{NavigateEvent.GOTO_MOVIE}" method="navigateStateHandler"/>
   <ListenerInjector eventType="{NavigateEvent.GOTO_PROFILE}" method="navigateStateHandler" />
</Injectors>
</EventMap>
上面的程式讓Main的View監聽導覽事件(NavigateEvent)的變化,所以在Main裡要寫一個public 的方法來接收事件,範例是用navigateStateHandler

Main.mxml

public function navigateStateHandler(event:NavigateEvent):void
{
var type:String = event.type;
switchMainState(type);
}
在設計上,如果僅是view的變化其實就可以用Listener Map來對應,如果以之前Cairngorm 的概念,View的變化要透過model的值改變,反查比較不易,用Listener Map一下就能知道那些View對應那些事件,這也是Mate依賴注入的好處

Blog參照:Mate Framework Part1, Mate Framework Part2


Flex Logger的Firebug target

0 意見

之前有介紹過Flex Logger跟ThunderBolt 這兩個Logging Framework,雖然Flex原生的就很好用,但Flex只提供trace Target,不像Thoundbolt有Firebug支援,為了開發方便,筆者寫了一個Flex Logger用的Firebug Target,有興趣可以參考


package idv.gd.utils.logging
{
    import flash.external.ExternalInterface;
    import flash.system.Capabilities;
    
    import mx.core.mx_internal;
    import mx.logging.LogEvent;
    import mx.logging.LogEventLevel;
    import mx.logging.targets.LineFormattedTarget;
    use namespace mx_internal;
    
    /**
     * firebug專用 log target
     * @author GD
     * 
     */    
    public class FirebugTarget extends LineFormattedTarget
    {
        private var formattedMessage:String;
        
        public function FirebugTarget()
        {
            super();
        }
        
        /**
         * 取得格式化後的lineFormatted message (內部method)
         * @param message
         * 
         */        
        override mx_internal function internalLog(message:String):void
        {
            formattedMessage = message;
        }
        
        /**
         * 送出訊息給Firebug
         * @param event
         * 
         */        
        override public function logEvent(event:LogEvent):void
        {
            super.logEvent(event);
            
            var message:String = formattedMessage;
            if (ExternalInterface.available) 
            {
                var level:int = event.level;
                switch (level)
                {
                    case LogEventLevel.DEBUG:
                    {
                        ExternalInterface.call("console.debug", message);
                        break;
                    }
                    case LogEventLevel.ERROR:
                    case LogEventLevel.FATAL:
                    {
                        ExternalInterface.call("console.error", message);
                        break;
                    }
                    case LogEventLevel.INFO:
                    {
                        ExternalInterface.call("console.info", message);
                        break;
                    }
                    case LogEventLevel.WARN:
                    {
                        ExternalInterface.call("console.warn", message);
                        break;
                    }
                    default:
                    {
                        ExternalInterface.call("console.log", message);
                        break;
                    }
                }
            }
            //保留trace
            trace(message);
        }


Flex UI測試工具:FlexMonkey

0 意見

2009-09-21_185920.png

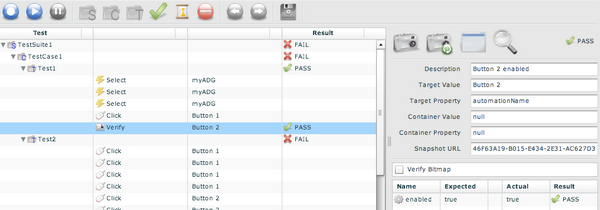
FlexMonkey是專門給Flex的UI測試工具(AIR),他可記錄Flex的元件操作,並像播放的方式重播,這可用在冗長的UI操作、Click等動作,最後再驗證結果是否符合預期。

雖然FlexMonkey非常好用但在複雜的事件機置似乎仍有問題,像是Mate Framework,可能FlexMonkey也是用Describetype等方式反監聽Flex元件,但在Mate由於多了EventMap介入,FlexMonkey一直不能正常運行,即使簡單的Mate專案也會有問題,這點是比較令人覺得可惜的

Google Code:http://code.google.com/p/flexmonkey/

網站:http://flexmonkey.gorillalogic.com/gl/stuff.flexmonkey.html


[教學]使用Subclipse做Flex版本控管 Part2

0 意見

繼上篇介紹過Subclipse安裝之後,接著介紹如何使用Subclipse開設新專案

筆者這次測試是用Google code的專案代管,這是Google所提供的免費空間,有1G的容量且支援SVN。

首先切換Perspective,在window -> Perspective -> Other 下找到瀏覽SVN檔案庫

接著在檔案庫上按右鍵選新增 -> 檔案庫位置,輸入SVN位置

新增好後會要求名稱及密碼,都輸入完後回到Flex Perspective

接著到要同步的專案,在專案上點右鍵,選擇 team -> share project,更新類型為SVN,接著選剛設好的SVN位置點下一步

2009-08-17_195721.png

這個步驟是匯入目前專案到SVN,但還沒真的更新,匯完後先把要加入SVN的檔案用右鍵 team -> add加入

2009-08-17_200529.png

這樣也還沒更新到伺服器,最後選team -> 送出才會上傳,上傳後可以試著改改看文件再上傳一次,我們來測試回復的動作

在文件檔點右鍵選team ->顯示資源歷程可看到文件更新歷史,這裡會顯示版本、日期及註解,點選要回復的版本按取回

2009-08-17_201304.png

顯示資源歷程也可以比較版本差異,SVN還有許多功能,筆者才剛試不久還沒摸熟,如果有什麼心得或意見也歡迎留言 :D


[教學]使用Subclipse做Flex版本控管 Part1

0 意見

Subclipse是給Eclipse的Subversion(SVN) Plug-in,所以基於Eclipse的Flex也能安裝,版本控管的好處在於在多人開發時能妥善分配權限,且資料集中在伺服器,不必憺心個人保管的問題,即使不小心修改錯了,SVN也能回溯先前的版本,保持專案正常運作,這部分的控管在大型專案很常見,但個人開發的Library也可用SVN做版本控管,以下做個簡單教學。

1.下載並安裝Subclipse

使用Help -> software updates -> find and install -> new remote site,輸入以下網址安裝,由於Flex的Eclipse是3.3版,所以可裝1.4及1.6,筆者這次的範例是裝1.6版。

subclipse 1.6.x:http://subclipse.tigris.org/update_1.6.x

subclipse 1.4.x:http://subclipse.tigris.org/update_1.4.x

官網的安裝教學:http://subclipse.tigris.org/servlets/ProjectProcess?pageID=p4wYuA

有些功能需要別的Plug-in支援,沒有的話可以取消勾選

2009-08-14_192957.png

2.使用Subclipse取回專案

先開啟SVN伺服器專案,使用File -> new -> other找到SVN,選自SVN取回專案

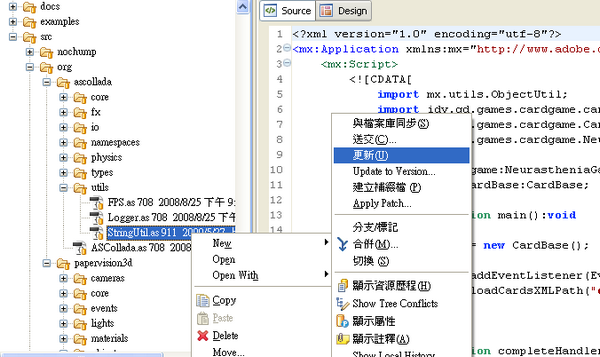
筆者這次是測試,所以先抓了Papervision3D的SVN做範例,另外有沒有人注意到,Subclipse很貼心的提供中文語系,雖然不完整,但看起來很有親切感。

2009-08-14_193748.png

取回trunk後放到本地的專案上,接下來的操作就跟一般一樣,要更新或送出只要按右鍵選Team即可

2009-08-14_194609.png

筆者當然沒有權限修改Papervison3D,所以只能更新,自己架設伺服器就可使用送交,把新版本送上伺服器。

這次範例只示範了安裝及取回,下一篇再來介紹使用Subclipse開設新專案


Visual Studio 上的 Flex Plug-in:Tofino

0 意見

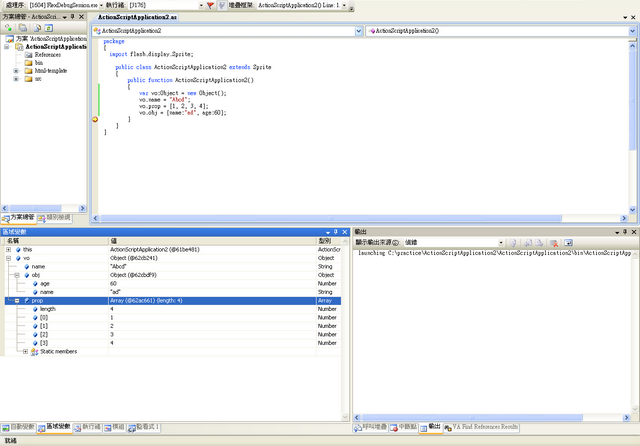
Tofino是完全免費的Flex plug-in,可讓.net人員撰寫flex、as專案,不必切換IDE,功能跟之前介紹的ASDT不同,這是給Visual Studio的Plug-in,有更完整的編輯介面(有code hit及文字變色)且直接支援break point,非常方便,唯一美中不足的是沒有預覽功能,且改Flex4 SDK會出現錯誤,目前還是Beta版,期待他日後的更新。

2009-08-14_191440.png

目前支援Visual Studio 2008,支援的平台為Windows XP及Vista

Tofino:http://www.ensemble.com/products/tofino.shtml


免費的Flex開發工具:eclipse + AXDT

0 意見

AXDT是eclipse的Plug-in,可用來撰寫Actionscript3及mxml,支援Flex SDK 3及Flex SDK 4,不過功能很陽春,Design mode只能顯示列表,且Code hit有限,文字也不會自動變色,唯一的好處是eclipse的編輯環境,對習慣eclipse快速鍵的人來說會比較好用。

另外網站上還有一個ASDT可下載,跟AXDT一樣是eclipse的Plug-in,可用來撰寫Actionscript2,由於不常用到筆者就沒試了。

裝完後可選AXDT的Perspective

2009-06-30_150938.jpg

AXDT編輯環境,可寫mxml,但Script不會跳code hit

2009-06-30_150913.jpg

有預覽模式但只是列表

2009-06-30_150558.jpg

執行效果,這裡只加一個按鈕跟日期選取組件,輸出結果同Flex,沒什麼太大問題

2009-06-30_150717.jpg

官方網站:http://axdt.org/

AXDT update site: http://update.axdt.org/

ASDT update site: http://aseclipseplugin.sf.net/updates/


Flash 多人連線伺服器:SmartFoxServer

0 意見

2009-06-23_181730.jpg

SmartFoxServer是相當強大的多人伺服器,以Flash Socket為基礎,可實現多人應用程式及MMO Game,由於是Java base開發,在Windows、Linux及MacOS都可運行,且client端支援AS1、AS2、AS3語法,專業版還能跨防火牆,功能相當強大。

2009-06-23_183745.jpg

當然,這不是免費軟體,試用版有20人的連線限制,無限制的專業版要2000歐元(約台幣九萬多),但若只是小遊戲,20人其實也夠了。

官方首頁:http://www.smartfoxserver.com/

中文概論:http://www.smartfoxserver.com/_cn/

遊戲範例:http://www.smartfoxserver.com/showcase/


好用的Flex Plug-in:Blueprint

0 意見

2009-06-22_101203.jpg

Adobe Labs在6/10所放出的Plug-in,能用在Flex Builder 3及Flash Builder(Gumbo)。

Blueprint主要是用來查詢語法範例,能直接在Flex內顯示結果,在只是忘掉API用法時非常好用,只要在要查詢的文字上按下Alt + B即可(也可使用搜尋框),這個Plug-in剛好彌補了Flex Help的不足,讓Flex更好用。

官網有完整教學,筆者就不再多述:

Blueprint:http://labs.adobe.com/technologies/blueprint/

安裝:http://labs.adobe.com/wiki/index.php/Blueprint:Installation_Instructions#Installing_Blueprint_-_Step_1

教學:http://labs.adobe.com/wiki/index.php/Blueprint:Using_Blueprint


[教學]Mate Framework Part2

0 意見

part1介紹過Mate架構跟流程,這次寫一個簡單範例來說明Mate的寫法

範例為使用DataGrid操作來自DataManager的資料。按此觀看範例

原始檔下載

2009-06-04_131314.jpg

Main.mxml

同上次的架構,程式的進入點是Main.mxml,裡面只要宣告EventMap、ModelMap跟要使用的UI

<?xml version="1.0" encoding="utf-8"?>
<mx:Application xmlns:mx="http://www.adobe.com/2006/mxml" layout="absolute" 
xmlns:maps="idv.gd.hellomate.maps.*"
xmlns:view="idv.gd.hellomate.views.*"
width="600" height="350">        
<mx:Style source="assets/style.css"/>
        
        <maps:MainEventMap/>
<maps:ModelMap/>
<view:DataList/>
</mx:Application>

DataList.mxml

DataList.mxml 為列表的UI,負責顯示、新增及刪除,在Mate架構中,UI的Domain Logic直接寫在mxml,或許會有點亂,但這種寫法也方便Mate做Data Binding

<!-- 部分程式碼 -->    
<!-- mate特有的Dispatcher,即使元件不在顯示列表或不可見,仍可送訊息給Mate -->
<mate:Dispatcher id="deleteAllDispatcher" 
generator="{ListEvent}"
type="{ListEvent.REMOVE_ALL}">
<!-- 可直接接收來自EventMap的回應 -->
<mate:ResponseHandler type="deleteItemResponse" response="Alert.show('ok')"/>
</mate:Dispatcher>

<!-- 能監聽自己內部跟Mate事件 -->
<mate:Listener type="{NavigationEvent.ADD_STATE}" receive="stateChangeHandler(event)"/>
<mate:Listener type="{NavigationEvent.LIST_STATE}" receive="stateChangeHandler(event)"/>
 <mx:DataGrid id="myDG" 
x="10" y="10" 
width="560" height="215"
dataProvider="{currentListAC}">
<mx:columns>
<mx:DataGridColumn headerText="標題" dataField="title"/>
<mx:DataGridColumn headerText="訊息" dataField="message"/>
</mx:columns>
</mx:DataGrid>

事件可由Mate的Dispatcher送出,也可使用原本的EventDispatcher,但事件的bubbles一定要為true,而<listener>的標籤可以聽到來自Mate的事件,但自己Bubbles上來的事件也會聽到,在設計時要注意

三種在Mate中傳事件的寫法:

一、使用<Dispatcher>:<mate:Dispatcher id="deleteAllDispatcher" generator="{ListEvent}" type="{ListEvent.REMOVE_ALL}">,用調用時呼叫 deleteAllDispatcher.generateEvent();

二、使用原生的EventDispatcher:this.dispatchEvent(new NavigationEvent(NavigationEvent.ADD_STATE));,由於事件bubble為true,EventMap可聽到事件

三、使用程式碼的Mate Dispatcher: var mateDispatcher:Dispatcher = new Dispatcher(); mateDispatcher.dispatchEvent(listEvent);

ListEvent.as

自定事件,寫法同一般Flash事件寫法,但為避免混淆,Mate建議在事件的常數後加上Class名,好讓事件不會重覆

public class ListEvent extends Event
{
//常數後加上Class名,避免名稱重覆
public static const DELETE:String = "deleteListEvent";
public static const REMOVE_ALL:String = "removeAllListEvent";
public static const ADD:String = "addListEvent";

public var item:ItemInfo;

//bubbles要為true,給EventMap聽
public function ListEvent(type:String, bubbles:Boolean = true, cancelables:Boolean = false, item:ItemInfo = null)
{
super(type, bubbles, cancelables);
this.item = item;
}

override public function clone():Event
{
return new ListEvent(type, bubbles, cancelable, item);
}
}

DataManager.mxml

為管理列表資料的Manager

        public class DataManager
{
public var listArrayCollection:ArrayCollection;

public function DataManager()
{
listArrayCollection = new ArrayCollection();
listArrayCollection.addItem(new ItemInfo("first item", "hello mate"));
listArrayCollection.addItem(new ItemInfo("second item", "test"));
}

public function deleteItem(item:ItemInfo):void
{
if (listArrayCollection)
listArrayCollection.removeItemAt(listArrayCollection.getItemIndex(item));
}

public function deleteAllItem():void
{
if (listArrayCollection)
listArrayCollection.removeAll();
}

public function addItem(item:ItemInfo):void
{
if (listArrayCollection)
listArrayCollection.addItem(item);
}
}

DataManager封裝了資料操作,這裡只外露一個listArrayCollection給外部View使用,也可把ModelManager做為資料物件跟View挷定,但要記得要給class設[Bindable],或自定Binding事件

MainEventMap.mxml

為Mate事件的中心,用以管理事件及專案的Business Logic

<?xml version="1.0" encoding="utf-8"?>
<EventMap xmlns="http://mate.asfusion.com/" xmlns:mx="http://www.adobe.com/2006/mxml">
<mx:Script>
<![CDATA[
import idv.gd.hellomate.events.*;
import idv.gd.hellomate.business.DataManager;
]]>
</mx:Script>

<!-- 監聽Mate事件,可呼叫Manager執行方法(Manager只會被生成一次)-->
<EventHandlers type="{ListEvent.DELETE}">
<MethodInvoker generator="{DataManager}" method="deleteItem" arguments="{event.item}"/>
</EventHandlers>

<EventHandlers type="{ListEvent.REMOVE_ALL}">
<MethodInvoker generator="{DataManager}" method="deleteAllItem"/>
<!-- 回應訊息給呼叫者 --> 
<ResponseAnnouncer type="deleteItemResponse"/>
</EventHandlers>

<EventHandlers type="{ListEvent.ADD}">
<MethodInvoker generator="{DataManager}" method="addItem" arguments="{event.item}"/>
<!-- 發送Navigation事件 -->
<EventAnnouncer generator="{NavigationEvent}" type="{NavigationEvent.LIST_STATE}" />
</EventHandlers>

其中<EventHandlers>的標籤為註冊Event要觸發的事件,這裡能調用ModelManager的方法,並可直接回傳內容(<ResponseAnnouncer>)或是呼叫事件(<EventAnnouncer>)

ModelMap.mxml

<?xml version="1.0" encoding="utf-8"?>
<EventMap xmlns="http://mate.asfusion.com/" xmlns:mx="http://www.adobe.com/2006/mxml">
<mx:Script>
<![CDATA[
import idv.gd.hellomate.views.DataList;
import idv.gd.hellomate.business.DataManager;
]]>
</mx:Script>

<!-- 注入資料,DataList生成時自動注入 -->
<Injectors target="{DataList}" debug="true">
<PropertyInjector targetKey="currentListAC" source="{DataManager}" sourceKey="listArrayCollection"/>
</Injectors>
</EventMap>

ModelMap.mxml底層其實是EventMap,這裡分出來只是為了釐清架構。其中<Injectors>是很特殊的標籤,會在目標元件生成時自動把資料注入,且若是Bindable物件,之後就可靠物件自己更新,在寫法上很方便。

總結

這次只寫個簡單範例練習,由於Mate可用Data Binding,在寫法上會比PureMVC好寫很多,但實際上使用還是要看專案的複雜度,沒有人說那個MVC Framework是最好的,端看開發人員習慣那種架構。

這次的練習不夠完整,如果寫法或概念有錯還請指正,謝謝


[教學]Mate Framework Part1

0 意見

2009-06-03_130504.jpg

Mate是給Flex開發的Framework,跟Cairngorm一樣只能在Flex下運作,比較特別的是Mata以mxml標籤撰寫,特有的EventMap跟Injector可在不破壞原架構的情況下注入行為,屬於非侵入式的框架。

一、架構

2009-06-04_131314.jpg

官網並沒有特別解釋要分成那幾類,這是按照官網範例的分類法,給大家參考

business:放置資料管理的ModelManager

events:放置自定事件

maps:放置EventMap跟ModelMap,Mate的主要核心

views:放置要顯示的UI Component

vos:放置Value Object

最外層為程式的進入點(Main.mxml)

二、流程

官網有完整的流程圖,這裡只挑幾個筆者覺得常用到的來講

先看一下mate的雙向流程圖

two_ways.png

如上圖,View透過事件驅動EventMap,在Mate裡所有的事件Bubble要設為true,讓上層元件可聽到事件,EventMap就是用來集中管理事件的地方,透過EventMap可呼叫要存取的網路服務或Manager,且可使用ResponseAnnouncer回傳訊息給呼叫者,不必再特別調用事件,當然想調用事件也可以,使用Mate的EventAnnouncer,可通知給對事件給感興趣的View。

使用Mate Adapter

model_adapter.png

除了使用EventAnnouncer及ResponseAnnouncer回應訊息外,還可透過ModelManager自動更新給View,這裡就要用到Flex的強項:DataBinding,我們可在程式初始時挷定View跟ModelManager的Bindable資料(例如ArrayCollection),在透過EventMap改變ModelManager時,由於是DataBinding,我們可不用送事件給View,Binding會自動送PropertyChange事件,一些Flex元件(像DataGrid)會自己更新,簡化了原本MVC煩雜的訊息溝通,這也是使用Mate的好處。

第一部分先簡單介紹架構與流程,下一篇會使用範例來說明,如果大家對Mate的流程感興趣,可參考Kenshin's Flex Blog的Mate教學

Mate官網:http://mate.asfusion.com/

教學文件:http://mate.asfusion.com/page/documentation

API DOC:http://mate.asfusion.com/api_docs/


Flash Builder 4 Beta、Catalyst Beta發佈

0 意見

這應該Adobe今天最熱門的新聞

Flash Builder是Flex Builder 4(Gumbo)的正式名稱,以後Flex指的是Flex SDK,Flash Builder才是開發介面(IDE),這次的改名也是為了符合Adobe的Platform,開發工具是Flash、Flash Builder,語言才是Flex SDK跟Actionscript

2009-06-02_163518.jpg

今天趁熱就裝起來了,介面有許多的改變,左上的樹狀列表變成跟Java一樣,有package跟libery,libery可反查類別及方法,相當方便,中間多了data/service跟network monitor,Component也多了Flash Component及Flash Container,似乎還有許多的功能,繼續測試中

Flash Builder4:https://www.adobe.com/cfusion/entitlement/index.cfm?e=labs_flashbuilder4

Catalyst 下載:http://www.adobe.com/cfusion/entitlement/index.cfm?e=labs_flashcatalyst


ThunderBolt 輕量級的Logging Framework

0 意見

2009-05-14_130158.jpg

上次有介紹過Flex的Logging Framework,這次來介紹ThunderBolt,ThunderBolt是第三方的Logging framework,使用簡單且相容於Flash、Flex及AIR,顯示的方式是透過FireBug(Firefox add-on),在AIR的環境則是透過ThunderBoltAS3Console顯示(AIR檔,可擷取flashlog.txt文件,平常也可以用來追蹤trace),且本身有支援Flex的LoggerTarget,簡單來說,我們能把Flex的TraceTarget換成ThunderBoltTarget,讓Flex Log顯示在FireBug上。

語法請參照:

AS3:http://code.google.com/p/flash-thunderbolt/wiki/ThunderBoltAS3

AS2:http://code.google.com/p/flash-thunderbolt/wiki/ThunderBoltAS2

Google Code:http://code.google.com/p/flash-thunderbolt/

WS-Blog:http://www.websector.de/blog/category/thunderbolt/


Degrafa 增強的Flex圖形Framework

2 意見

2009-05-06_123740.jpg

Degrafa提供更進階的圖形繪製能力,可用來彌補Flex的不足,能使用mxml語法繪制圖形,也能提供更進階的css樣式及自定樣式,另外也能撰寫簡單的repeat跟程式

Google code:http://code.google.com/p/degrafa/

Degrafa home:http://www.degrafa.org/index.html

寫一個簡單範例,用Degrafa做出標籤頁的效果

2009-05-11_130113.jpg

觀看範例

原始檔下載


好用的網站開發工具─Charles

2 意見

2009-04-20_230914.jpg

介紹一個好用的開發工具Charles,Charles可觀看目前網頁的狀態,可得知被載入的檔案以及傳收的值(類似HttpWatch),比較特殊的是他可限制流量,模擬下載頻寬,對Flex這種沒有模擬頻寬的開發工具來說,非常好用,且Charles也可觀看loadMovie、loadVariables及Flash Remoting,並支援IE、Firefox及Safari,非常強大,有興趣的朋友可以試試。

2009-04-20_231923.jpg

Firefox記得要加裝add-on,如果沒有JRE也要先裝

Charles:http://www.charlesproxy.com/index.php


[教學][PureMVC]使用Fabrication與Module溝通

0 意見

之前有介紹過Pipes Util,雖然Pipes能有效解決PureMVC與Module間溝通的問題,但寫起來實在太繁雜了,在此介紹一個簡單又好用的工具─Fabrication,Fabrication一樣是PureMVC的Util,最大的特徵是能簡化PureMVC的撰寫,包括宣告跟註冊事件,且最令人感心的是連Pipes都簡化了,不用再宣告一大堆管子、連結器什麼有的沒的,只要用PureMVC類似的Notification機置就能完成,寫起來真的是方便許多。

寫個簡單範例,這個範例跟上次的PureMVC + Pipes功能相同,可以拿來做個比較

程式架構

2009-04-08_182938.jpg

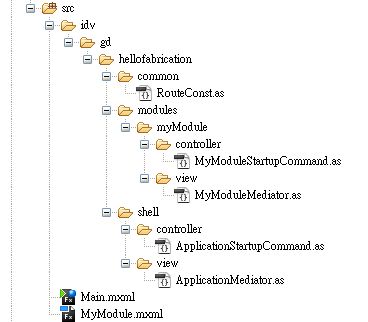
Main為Loader,MyModule為Loadee,程式為實做Main跟MyModule溝通

在Fabrication內,Facade會被隱藏起來,所以是沒有Facade的Class,取而代之的是一開始進入的StartupCommand,為了管理Notification,範例另存一個常數的Class,並放在common,方便所有Module操作

<?xml version="1.0" encoding="utf-8"?>
<fab:FlexApplication
xmlns:fab="org.puremvc.as3.multicore.utilities.fabrication.components.*" 
xmlns:mx="http://www.adobe.com/2006/mxml"
layout="absolute"
creationComplete="init();" fontSize="12">

<mx:Script>
<![CDATA[
import idv.gd.hellofabrication.shell.controller.ApplicationStartupCommand;

override public function getStartupCommand():Class
{
return ApplicationStartupCommand;
}
]]>
</mx:Script>

<fab:FlexModuleLoader id="moduleLoader" x="317"/>

<mx:TextInput id="sendMsg"  width="160" x="0" y="30"/>
<mx:Button id="sendBtn" label="Send" y="30" x="168"/>
<mx:Label x="0" y="2" text="Shell"/>
<mx:Button x="235" y="30" label="Info" id="infoBtn"/>
</fab:FlexApplication>

首先繼承Fabrication內的FlexApp(AIR用AirApp),在一開始指定要呼叫的起始命令,要注意的是StartCommand的前置詞會被Fabrication設成ClassName,這是用來識別Shell跟Module的,所以在命名上小心別重覆了

由於沒有Facade,所以透過StartupCommand來宣告所有的controller,由於StartupCommand正常上只會被執行一次,所以不必憺心會重覆宣告(範例僅用到registerMediator)

package idv.gd.hellofabrication.shell.controller
{
import idv.gd.hellofabrication.shell.view.ApplicationMediator;

import org.puremvc.as3.multicore.interfaces.INotification;
import org.puremvc.as3.multicore.utilities.fabrication.patterns.command.SimpleFabricationCommand;

public class ApplicationStartupCommand extends SimpleFabricationCommand
{               
override public function execute(notification:INotification):void
{
var main:Main = notification.getBody() as Main;

registerMediator(new ApplicationMediator(main));                        
}
}
}

Mediator需繼承自FlexMediator,Fabrication的Mediator能透過onRegister去註冊方法,取代PureMVC原本的interestedList跟Switch case,只要方法下reactTo、respondTo關鍵字就能分別聽到Event跟Notification,這是Fabrication最特殊的Reflexive功能,比較可惜的是由於Reflexive是透過describeType倒出,所以方法只能下Public,失去程式封裝的原則,寫起來是很方便,但要小心拼錯是不會跳錯誤的,改常數名字時也是一個大工程...。(還是可用PureMVC的方式宣告,FlexMediator是繼承自Mediator)

格式大致如下:

reactTo <物件> <事件名> (event:<對應事件>)

respondTo <Notification名稱> (note:INotification)

再來就是最重要的Module溝通了,Fabrication能藉由Pipes做Module溝通(Pipes要另外匯入),只要一開始有把Module的defaultRouteAddress跟router設為Shell的applicationAddress、applicationRouter即可,之後再透過routeNotification來傳送通知,當然也能指定要送給誰,在routeNotification的第四個參數可決定傳送對象,"*"為全部,過濾格式為 <Class name/ instance name>,Class name就是我們之前宣告的StartupCommand的前置詞,也能使用flexModule.moduleAddress.getClassName()來取得Module名稱

ApplicationMediator

package idv.gd.hellofabrication.shell.view
{
import flash.events.MouseEvent;

import idv.gd.hellofabrication.common.RouteConst;

import mx.controls.Alert;
import mx.controls.Button;

import org.puremvc.as3.multicore.interfaces.INotification;
import org.puremvc.as3.multicore.utilities.fabrication.components.FlexModule;
import org.puremvc.as3.multicore.utilities.fabrication.components.FlexModuleLoader;
import org.puremvc.as3.multicore.utilities.fabrication.patterns.mediator.FlexMediator;

public class ApplicationMediator extends FlexMediator 
{               
public static const NAME:String = "ApplicationMediator";        

public function ApplicationMediator(viewComponent:Main)
{
super(NAME, viewComponent);             
}

override public function onRegister():void
{
super.onRegister();

moduleLoader.router = this.applicationRouter;
moduleLoader.defaultRouteAddress = this.applicationAddress;

moduleLoader.url = "MyModule.swf";

var vm:FlexModuleLoader = new FlexModuleLoader();
}

/**
* view內所有的元件使用  reactTo<ComponentName + EventName> 註冊(Fabrication會自動解析,監聽)
*/
public function reactToSendBtnClick(event:MouseEvent):void
{
var module:FlexModule = FlexModule(moduleLoader.child);

//第四個參數決定傳送給誰,"*"為全部,過濾格式為 <Module name/ Module child instance name>
routeNotification(RouteConst.SHELL_MESSAGE, main.sendMsg.text, null, "MyModule/*" );
}       

public function reactToInfoBtnClick(event:MouseEvent):void
{
var msg:String = "";
var module:FlexModule = FlexModule(moduleLoader.child);

msg += "Main Name: " + this.applicationAddress.getClassName() + "\n";                  
msg += "Module Name: " + module.moduleAddress.getClassName();

Alert.show(msg);
}                                               

/**
* 將mediator感興趣的notification寫成 function,格式為:respondTo<NotificationName>
*/
public function respondToModuleMessage(note:INotification):void
{
main.sendMsg.text = note.getBody().toString();
}

/**
* 元件要設 get,使用reactionTo參照的元件,modifier要設為 public
*/             
public function get sendBtn():Button
{
return main.sendBtn;
}

public function get moduleLoader():FlexModuleLoader
{
return main.moduleLoader;
}

public function get infoBtn():Button
{
return main.infoBtn;
}

protected function get main():Main
{
return viewComponent as Main;
}
}
}

要接收RountNotification一樣用RespondTo來接收,跟Pipes的概念不太一樣,沒有獨立的溝通管道,而是直接整合成PureMVC通知架構,這樣也是有好有壞,有時會搞不清楚通知是來自Module還是自己

MyModuleMediator

package idv.gd.hellofabrication.modules.myModule.view
{
import flash.events.MouseEvent;

import idv.gd.hellofabrication.common.RouteConst;

import mx.controls.Button;

import org.puremvc.as3.multicore.interfaces.INotification;
import org.puremvc.as3.multicore.utilities.fabrication.patterns.mediator.FlexMediator;

public class MyModuleMediator extends FlexMediator
{               
public static const NAME:String = "ApplicationMediator";        

public function MyModuleMediator(viewComponent:MyModule)
{
super(NAME, viewComponent);             
}

public function respondToShellMessage(note:INotification):void
{
myModule.sendMsg.text = note.getBody().toString();
}

public function reactToSendBtnClick(event:MouseEvent):void
{
routeNotification(RouteConst.MODULE_MESSAGE, myModule.sendMsg.text, null, "*");
}       

protected function get myModule():MyModule
{
return viewComponent as MyModule;
}
                public function get sendBtn():Button
{
return myModule.sendBtn;
}
}
}

範例要加掛PureMVC MultiCore、Pipes跟Fabrication的library

原始檔下載:http://gwbasic12.googlepages.com/Practice_Fabriation.zip

Google code:http://code.google.com/p/fabrication/

Drunks Blog:CodeDrunks Blog


Flex 4 Gumbo

0 意見

官方網站目前己可下載Milestone的SDK,雖然沒有IDE可用,但還是可體驗一下Flex4 Gumbo的新語法,比較特殊的是FXG跟State吧,其它的還在看

SDK下載頁面:http://opensource.adobe.com/wiki/display/flexsdk/Download+Flex+4

官方介紹頁:http://opensource.adobe.com/wiki/display/flexsdk/Gumbo

範例教學:http://blog.flexexamples.com/


[PureMVC] 使用Pipes Util 實現Module間溝通

1 意見

之前在Micro Architecture PureMVC一篇有介紹到多核版的PureMVC架構,所謂的多核,指的是同一專案能出現多個實做PureMVC的模塊,在Flex是以Module的方式實現,讓每個Module都有各自的Facade,功能獨立。但PureMVC本身未提供Module間彼此溝通的方法,雖然我們可以用Interface等方法來管理每個Module,但這會使程式的關聯太高,失去MVC的好處,所幸己有高手解決了這個問題,官方網站的Pipes Util就是用來處理Module的問題,他能在Module間再架一層溝通架構,能每個Module都能像送Notification的方式彼此溝通,下面寫個簡單的範例說明

程式為Shell跟Module互傳訊息,Shell是讀入Module的主程式,Module是獨立的PureMVC架構

2009-03-21_210435.jpg

PipeUtil主要是靠JunctionMediator跟其它Module溝通,由於JunctionMediator是繼承自Mediator,所以可再收發Notification,使Module間的訊息可走回原本的PureMVC架構

package idv.gd.hellopipes.shell.view
{
import idv.gd.hellopipes.common.PipeAwareModule;
import idv.gd.hellopipes.shell.ApplicationFacade;

import org.puremvc.as3.multicore.interfaces.INotification;
import org.puremvc.as3.multicore.utilities.pipes.interfaces.IPipeAware;
import org.puremvc.as3.multicore.utilities.pipes.interfaces.IPipeMessage;
import org.puremvc.as3.multicore.utilities.pipes.messages.Message;
import org.puremvc.as3.multicore.utilities.pipes.plumbing.Junction;
import org.puremvc.as3.multicore.utilities.pipes.plumbing.JunctionMediator;
import org.puremvc.as3.multicore.utilities.pipes.plumbing.Pipe;
import org.puremvc.as3.multicore.utilities.pipes.plumbing.TeeMerge;
import org.puremvc.as3.multicore.utilities.pipes.plumbing.TeeSplit;

/**
* junction是實際拿來連結的實體,架構在原本的puremvc內(mediator)
*/
public class ShellJunctionMediator extends JunctionMediator
{
public static const NAME:String = "AppJunctionMediator";

public function ShellJunctionMediator()
{
//Junction為不可見的連結實體,用來管理 shell跟module的關係
super(NAME, new Junction());
}

override public function listNotificationInterests():Array
{
return [ApplicationFacade.MODULE_ADDED, ApplicationFacade.SEND_MESSAGE];
}

override public function handleNotification(note:INotification):void
{
switch (note.getName())
{
case ApplicationFacade.MODULE_ADDED:
{
var module:IPipeAware = IPipeAware(note.getBody());
connectPipe(module);
break;
}
case ApplicationFacade.SEND_MESSAGE:
{
var message:Message = new Message(PipeAwareModule.SHELL_MESSAGE, null, note.getBody());
junction.sendMessage(PipeAwareModule.SHELL_TO_MODULE, message);

break;
}
}
}

/**
* 連結pipe跟接口
*/
private function connectPipe(module:IPipeAware):void
{
//註冊pipe及產生接口
junction.registerPipe(PipeAwareModule.SHELL_TO_MODULE, Junction.OUTPUT, new TeeSplit());
junction.registerPipe(PipeAwareModule.MODULE_TO_SHELL, Junction.INPUT, new TeeMerge());

//監聽訊息
junction.addPipeListener(PipeAwareModule.MODULE_TO_SHELL, this, handlePipeMessage);

//連結 module跟shell
var moduleToShell:Pipe = new Pipe();
module.acceptOutputPipe(PipeAwareModule.MODULE_TO_SHELL, moduleToShell);

var shellInFitting:TeeMerge = junction.retrievePipe(PipeAwareModule.MODULE_TO_SHELL) as TeeMerge;
shellInFitting.connectInput(moduleToShell);

//連結shell跟module
var shellToModule:Pipe = new Pipe();
module.acceptInputPipe(PipeAwareModule.SHELL_TO_MODULE, shellToModule);

var shellOutFitting:TeeSplit = junction.retrievePipe(PipeAwareModule.SHELL_TO_MODULE) as TeeSplit;
shellOutFitting.connect(shellToModule);
trace("connected");
}

override public function handlePipeMessage(message:IPipeMessage):void
{
switch (message.getType())
{
case PipeAwareModule.MODULE_MESSAGE:
{
sendNotification(ApplicationFacade.GET_MESSAGE, message.getBody());
break;
}
}
}

}
}

連結是透過Pipe監聽訊息,這部分寫起來比較麻煩,但可限制那些Module之間可以溝通,以及要監聽的訊息

原始檔下載


Micro Architecture ─ PureMVC Part2

0 意見

把之前的補完,先介紹一下Mediator

Mediator用來管理可見元件,讓原本UI能與PureMVC溝通,主要負責觸發跟反應Notification

ApplicationMediator


package idv.gd.pureMVCTest.view
{
import flash.events.MouseEvent;

import idv.gd.pureMVCTest.ApplicationFacade;

import org.puremvc.as3.interfaces.INotification;
import org.puremvc.as3.patterns.mediator.Mediator;

public class ApplicationMediator extends Mediator
{
public static const NAME:String = "ApplicationMediator";

public function ApplicationMediator(viewComponent:Main)
{
super(NAME, viewComponent);
}

/**
* view內所有的元件註冊在此
*/
override public function onRegister():void
{
super.onRegister();

facade.registerMediator(new RSSReaderMediator(main.reader));

main.newsBtn.addEventListener(MouseEvent.CLICK, getNewsHandler);
main.techBtn.addEventListener(MouseEvent.CLICK, getTechHandler);
}

private function getNewsHandler(event:MouseEvent):void
{
facade.sendNotification(ApplicationFacade.READ_NEWS);
}

private function getTechHandler(event:MouseEvent):void
{
facade.sendNotification(ApplicationFacade.READ_TECH);
}

protected function get main():Main
{
return viewComponent as Main;
}
}
}

Mediator會對應到一個名稱,寫法上以常數宣告,讓Facade可取用對象,若Mediator所管理的UI有子元件,每個子元件都可在此註冊,在寫法上為了避免管理的子元件尚未生成,註冊元件時應盡量寫在onRegister裡,Constructor有時會出現問題

雖然Mediator可取得Proxy跟其它的Mediator,但會耦合性會過高,以Notification通知Command,再以Command操作Proxy的方式比較妥當,而Mediator去操作其它的Mediator是絕對不允許的

Proxy同Mediator要有一個識別名,用來管理資料及封裝操作的方法,實現Domain Logic,在官方文件還有一種RemoteProxy,不過我個人比較喜歡拆成Delegate跟Proxy,讓Delegate管遠端要值的方法,方便之後抽換

RSSProxy


package idv.gd.pureMVCTest.model
{
import idv.gd.pureMVCTest.ApplicationFacade;
import idv.gd.pureMVCTest.model.business.RSSDelegate;
import idv.gd.pureMVCTest.model.vo.InfoVO;

import mx.collections.ArrayCollection;
import mx.controls.Alert;
import mx.rpc.IResponder;

import org.puremvc.as3.patterns.proxy.Proxy;

/**
* proxy用來維護資料,保有原始資料及操作方法
*/
public class RSSProxy extends Proxy implements IResponder
{
public static const NAME:String = "DataProxy";

public function RSSProxy(data:Object = null)
{
super(NAME, data);
}

/**
* 使用 delegate來取得內容,使用 delegate才方便抽換取得來源
*/
public function getRealNews():void
{
var delegate:RSSDelegate = new RSSDelegate(this);

delegate.getNews();
}

public function getTech3c():void
{
var delegate:RSSDelegate = new RSSDelegate(this);

delegate.getTech3c();
}

public function removeItemAt(index:uint):void
{
if (infoVO)
{
infoVO.content.removeItemAt(index);
}
}

public function removeAll():void
{
infoVO.content.removeAll();
}

public function result(resultEvent:Object):void
{
var data:Object = resultEvent.result;
var title:String = data.rss.channel.title;
var lastBuildDate:String = data.rss.channel.lastBuildDate;
var content:ArrayCollection = data.rss.channel.item;

var vo:InfoVO = new InfoVO(title, lastBuildDate, content);

this.data = vo;

this.facade.sendNotification(ApplicationFacade.RSS_LOAD_COMPLETE, infoVO);
}

public function fault(data:Object):void
{
this.facade.sendNotification(ApplicationFacade.RSS_LOAD_FAULT);
}

protected function get infoVO():InfoVO
{
return data as InfoVO;
}

}
}

在多核心的版本,其實只是多了一組管理Facade的Map,跟Mediator及Proxy一樣,生成時要有個識別的名字,其它用法一樣

Main.mxml


//進入點要有識別名,用來識別 facade instance
public const NAME:String = "Main";
private var facade:ApplicationFacade = ApplicationFacade.getInstance(NAME);

ApplicationFacade


public function ApplicationFacade (key:String)
{
super(key);
}

原始檔下載(Flex專案檔,附PureMVC Standard)